Building The Ark: 1/24 Scale Model
Building a scale model of the ark is a significant undertaking, but it is very worthwhile if you can manage it. There are several good reasons to build one:
- It makes a very impressive, very memorable decoration. We first did this in 2006. It is now 2012, and people in our church still remember it. How many of your Bible School decorations from six years ago do you remember? You'll remember this one.
- It provides a good way to get more people involved with your VBS. Building it the way these instructions indicate is a very
parallelizable
task. What I mean is this: you can easily put 20-30 people to work on it at the same time. Much of the work involves gluing cardboard boxes together and holding them in place while the glue dries. Virtually anyone can participate. Hold a workday, perhaps on a Saturday a couple of weeks before your Bible School, and get as many people involved as possible. - Most people, including most Christians, have a very inadequate conception of the ark's size. The fact that people can even ask the question,
How could all the animals fit on the ark
, betrays a fundamental lack of any sense of exactly how large the ark was. You can tell people it was 450 feet long, but that's just a number. To really grasp how large it was, people need to see it. Building a scale model, and placing appropriately scaled animals inside, provides a much more intuitive, tangible picture that people can readily understand and remember. (Building it full size would be even better, but you might not quite have the budget for that. This scale model is much more affordable.)
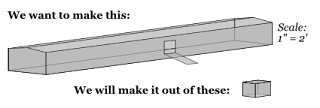
So, we want to build this:
Wood is expensive, and the model doesn't need to be seaworthy, so we'll just build it out of corrugated cardboard boxes, glued together with plain white glue (e.g., Elmer's). We chose the cardboard boxes that our local Wendy's restaurant gets its fries in, for two reasons: first, we were able to get a large number of these boxes, all the same size, and second, the size of the box (16" x 13" x 13") just happened to work out so that the width and length of the model are very close to an exact multiple of the box size. Thus, we only have to cut for height. When we get the boxes they have been "broken down" (i.e., unfolded and laid flat).
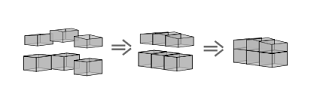
The ark will be made of 14 sections. Each section is made from six boxes, like this:
The bottom part of each section consists of three whole boxes. Simply glue the flaps closed (like they would have been before the boxes were opened to get the original contents out -- first glue the bottom of the box closed, then the top), then glue three of them together side-to-side, like this:
The top part involves cutting.

 Start with the middle top box. The bottom of this box should be glued closed, but the top flaps are not needed. Measure the height of the corners at twelve inches (from the bottom), and find the middle of each end (along the top edge). Draw straight lines from the 12-inch mark on each corner to the center mark at the top middle of the end. Cut along these lines. Along the sides of the box, draw straight lines from the twelve-inch mark on the one corner to the one on the other corner. Cut along these lines too. The end of the box should look like this:
Set the top-middle box aside for a moment and we'll make the two top-side boxes next.

 Along one side of the box, measure the height at twelve inches (from the bottom) at both ends. On the other side of the box, measure the height at nine inches (from the bottom) at both ends. Draw straight lines between the height marks at the corners and cut off the top. Make two of these, and we'll be ready to finish assembling the section.
Glue the six boxes together as shown. This makes one fourteenth of the basic structure of the ark. If you have enough people (and enough space), you can construct all fourteen of these at once.
 For the roof, we will use boxes that are not glued shut.
  Start with two of them. Orient one of your boxes so that the long side is upward and the other so that the short side is upward. (Along the entire length of the roof, alternate orientation every-other-box. This will improve the stability of the roof so that it does not bend as much and stays in place better.)
 Slice the top edge (corner) on both your boxes, then flip them over so that the sliced edges hang down. You should have a center fold at the top of each box, with two panels (one long, one short) hanging down on each side. Measure the height of the sides at 21 inches down from the fold: draw a straight line there and cut off the extra from the bottom.
Move the two boxes together so that the flaps overlap. One box will have its flaps on the
insidewhile the other box will have its flaps on the
outside. On the side facing you, one box will have its tall panel above the short one, and the other will have its short panel above the tall one. (On the side away from you it will be the other way around.) Once you get everything in position, with the folds at the top lined up and the flaps exactly overlapping each other (but not overlapping the main parts of the other box), glue them together. Link a total of twelve boxes like this. When you are done, you should have a single continuous long roof, hinged at the center. Altogether it should be 225 inches long and 42 inches wide (21 inches on each side of the fold).

Glue the sections together end-to-end-to-end.

If you created
opensections with decks where you will display the animals and stocks of food and so forth, make sure you get them in the part of the ark where you want them, so that people will be able to walk up and look inside. Altogether, there should be fourteen sections in all.

Now, drape the roof over the top, and secure it in place. (You can use small L-shaped pieces of cardboard as brackets.)

Cover the whole surface of the ark with
pitch(we used black paper; it would also be possible to use spray paint). Display it in a prominent location, such as on the stage in your auditorium, or in your foyer or entryway if it's large enough. (Our stage is too small, so we angled the ark from the back corner of the stage out across and off the front of the stage on the other side; we used additional boxes to build a stand to support the ends that sticks off, and we covered the stand with a tarp —blue to represent water or green to represent grass.)
If you made an open section, set up the animals and food bins and so forth inside the ark. If not, perhaps you could set up some animals approaching the ark, for scale. Be sure to use animals that are at the right scale. One inch represents two feet, so a six-foot-tall Noah would be three inches. A typical elephant would be between 4 and 5 inches tall at the shoulder. You can look up the sizes of other animals and scale them: simply take the after size of a young adult animal in feet, divide the number by two, and your model animal should be that many inches. (If you want something a modern child who doesn't go to the zoo much can relate to, a standard US school bus would be 18 inches long. Split a picture of a school bus in half so you can print it out, glue the two halves together onto posterboard, and display it near the ark.
Congratulations, you've built a 1/24 scale model of the ark.
Update: I've put up photos showing the one we built. part 1, part 2.


No comments:
Post a Comment